
Introduction
There are many different blog platforms out there. The objective was to pick a blogging platform that was to meet the following requirements:
- Popular (so that there are plenty of documentations on it)
- Low overhead (Quick to setup and maintain)
- Allow for articles to be written in Markdown
- Have menu and toolbar for organization
- Have static-site generator feature (Web3/IPFS Deployment optionality)
- Easy to Blog and showcase portfolio projects
- Clean layout
This article details the step for setting up a Docusaurus website with blog and showcase portfolio pages.
Walkthrough
Step 1 - Verify Requirements
NodeJS 16.14 or above is required (node -v can be used to check version) to setup Docusaurus. Node.js can be downloaded here: Node.js
Step 2 - Install Docusaurus
The following command will install the classic theme docusaurus website. Replace my-website with the name of the website project (eg. dysntr.github.io).
npx create-docusaurus@latest my-website classic
For more details refer to this link.
Step 3 - Running the Development Server
The following command starts a local webserver that serves the docusaurus website.
cd my-website
npm start
The website can be accessed at http://localhost:3000.
Step 4 - Setup the Config
The website config needs to be added to docusaurus.config.js file. For full details refer to this link.
Here are some of the information you need to setup the config:
note
title: Website title (eg. Dysan\'s Site)
tagline: Website tagline (eg. A place to document discoveries and projects)
url: https://dysntr.github.io/
favicon: Link for the favicon (eg. img/favicon.ico)
projectName: Usually your repo name (eg. dysntr.github.io)
organizationName: Usually your GitHub org/user name (eg. dysntr).
deploymentBranch: The branch to generate the static pages to (eg. deploymentBranch: 'gh-pages',)
presets docs/blog editUrl: Link to the github repo (eg. https://github.com/dysntr/dysntr.github.io)
themeConfig:navbar: navigation bar config ( eg. title: 'Home', href: 'https://github.com/dysntr/dysntr.github.io')
themeConfig:footer: footer config (eg. twitter settings href: 'https://twitter.com/dysntr', github settings href: 'https://github.com/dysntr/dysntr.github.io' )
themeConfig:copyright: copyright config (eg. Copyright © ${new Date().getFullYear()} Dysan Inc. Built with Docusaurus.)
Full config for this site can be found here.
Step 5 - Cleaning Up the Default Website
Some of the default pages and articles need to be cleaned up to finish the website.
Here are some of the things this section covers:
- Rename the Tutorial section to "Documentation"
- Move all the default tutorials to "Docusaurus Website Tutorials" Menu
- Remove the default authors, and add yourself to authors
- Remove the default blog articles, and this article as a blog article
- Clean up the Home page
Rename the Tutorial section to "Documentation"
Update docusaurus.config.js file to modify the top menu bar.
There are two places in docusaurus.config.js that Tutorial needs to be changed to Documentations.
- Under
themeConfig:navbar:items:label:changeTutorialtoDocumentations - Under
themeConfig:footer:links:items:label:changeTutorialtoDocumentations
Move all the default tutorials to "Docusaurus Website Tutorials" Menu
Change the file and folder structures to modify the left toolbar.
- Create a new folder
\Website\docs\docusaurus-website-tutorialswhere "Website" is your project name. - Copy category.json file from
tutorial-basicsto the new folder, and update label and description to"Docusaurus Website Tutorials", and position to 2. - Move
\docs\tutorial-basics,\docs\tutorial-extrasandintro.mdto this new folder. - Create a
intro.mdindocsfolder with following content:
---
sidebar_position: 1
---
# Introduction
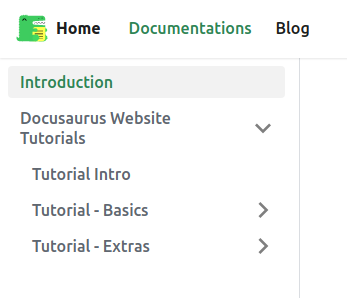
The left toolbar of the website will look something like this:
Remove the default authors, and add yourself to authors
The author file allows blog artciles to reference a specific author in the article. The file includes things like name, title, url, image_url.
To add yourself, edit the .\blog\authors.yml file. Change one of the authors to yourself and delete the others. The thing to note is that, your github profile picture can be accessed via the link https://github.com/<username>.png (eg. https://github.com/dysntr.png).
Remove the default blog articles, and this article as a blog article
To create a blog article, create a new folder under \blog folder. Follow the naming convention date-articlesubject eg.06-27-2022-creating-a-docusaurus-blog.
Every blog article has a Markdown file. At the top of the file, a file descriptor header needs to be included. Here is an example
---
slug: creating-a-docusaurus-blog
title: Creating a Docusaurus Blog
authors: Dysan
tags: [website, blog, docusaurus]
---
Place the above header in index.md file under \blog\06-27-2022-creating-a-docusaurus-blog folder.
Delete all the other blog files and folders under \blog folder.
Add whatever you like to index.md as this will be the first blog article for the website.
Cleanup the Home page
The Home page is the first that shows up when a user visits the website URL. This page is located at ./Website/src/pages/index.js
Change the button name from Docusaurus Tutorial - 5 min to Check out the Blog!.
Change the button link to take users to the blog page, i.e. to="/blog/">.
Remove <HomepageFeatures /> from the page, this can be added later once additional customization have been completed.
Step 6 - Deploy to GitHub Pages
This step will provide the steps to deploy the website to Github pages.
note
Each GitHub repository is associated with a GitHub Pages service. If the deployment repository is called my-org/my-project (where my-org is the organization name or username), the deployed site will appear at https://my-org.github.io/my-project/. Specially, if the deployment repository is called my-org/my-org.github.io (the organization GitHub Pages repo), the site will appear at https://my-org.github.io/. Source
First, create the github repository dysntr.github.io, where dysntr is the user/org name. Commit and push your first commit using the following commands:
git init
git add *
git commit -m "first commit"
git branch -M main
git remote add origin https://github.com/dysntr/dysntr.github.io.git
git push -u origin main
To deploy the website run GIT_USER=<GITHUB_USERNAME> yarn deploy eg. GIT_USER=dysntr yarn deploy
For more details on deployment refer to link.
Conclusions
This article provided the steps required to setup and deploy a basic blog website to Github pages.
Future Things to Do
Future work to be considered for this project are:
- Additional blog customizations and personalization (colors, background images, fonts, etc.).
- Adding project portfolio showcase.
- Deploying the website to IPFS and setting up ENS.